Open topic with navigation
4 Steps to create a schedule

1. To create a schedule click on 'Add' located in the 'Schedules' section of the menu.
- Make any adjustments to the schedule (add comments, update shift times, enter in requests) before releasing the requests.

- If you need to add a 'Scheduler comment' for one of your providers, select the provider name from the 'Select provider' drop down menu. Then click on 'Toggle editing of scheduler comments (CTRL + 1)'. Scheduler comments are displayed at the bottom of each day.
- You have the ability to update 'Shift times' in the 'Provider' section in the top menu.
- Enter in schedule requests: Select the provider's name from the 'Select provider' drop down menu. Click on 'View and manage shift requests for providers' option will appear. (It looks like a calendar.) Here you can inform ByteBloc about the shifts that your providers have requested off in the current schedule.

- Click on 'New Version' to create the schedule request. In the 'Version purpose' drop down menu, select the 'Requests' option.
2.Optional: 'Extend publication request' close date/time within the 'Manage' screen or the 'Version Info' window.
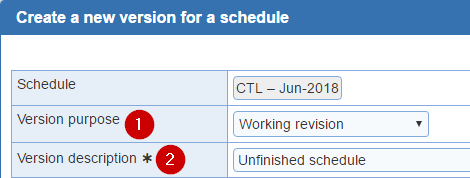
3. Create a 'New Version' as a working revision. You can name the 'Version description' whatever you want.

- Highlight shifts based on likely easiness to schedule (CTRL +6): A metric indicating the likely easiness with which shifts can be assigned is available from the 'hot spots' tool in the schedule revision screen.

- Automate: If you prefer to do automation, click the 'Automate' button after you have entered all necessary lock scheduled and off shifts, and made any changes to provider request specific to the current schedule. As each shift is scheduled, the name of the newly scheduled provider replaces the blank line that had previously represented the unscheduled shift. Depending on the speed of your computer and the complexity of your schedule, the entire scheduling process requires anywhere from a few seconds to several minutes. Otherwise, you can schedule manually.
After computerized scheduling is complete, you may then review and Clear, modify and distribute your schedule as desired.

- Provider settings: Edit the hours and shift request, shift sequences, and shift preferences for providers for this version.

- Summary: Click the 'Summary' button if you want ByteBloc to display the shifts and hours statistics for the schedule, showing totals for any cycle scheduled, locked and off shifts that you have entered. The summary categories you defined in the Customize schedule of the Scheduler portal are used to create the display. When accessing from the revision screen now includes columns for 'in row shifts' and 'category in row shifts'.

- Highlight one provider: Use the highlight one provider option by selecting a provider from the provider drop down menu. If you want ByteBloc to review an individual provider's schedule, highlighting all of the shifts worked by that provider. You can use this to easily confirm that cycle and lock scheduling is correct. Summary and shift availability information specific to that provider is also displayed.

- Show All Stats: A quick view of the statistics for a specific provider selected in the drop down menu located at the bottom of the screen. You can mouse over 'Show all stats' and it will display all categories. If you want to look at report click on 'Summary' from the menu navigation.

4. Review your finished schedule.
Note: Once you create the final schedule (As-scheduled) it becomes the 'As-worked' version.


