Open topic with navigation
Instructions for using ByteBloc with the CEP scheduling website
Contents
Steps A, B, and C are optional and you can achieve better results by using the ByteBloc software instead of the CEP website to collect provider requests and publish the schedule. ByteBloc allows the providers to enter their requests using the built-in mobile apps and also enable them to trade shifts and use the swap meet functionality.
A. Publish a 'Requests' schedule to the CEP website
- Create a 'Requests' schedule in ByteBloc
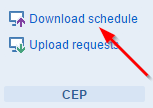
- On the ribbon menu under the CEP group, click on 'Download Schedule'
- The upload schedule popup window will appear:

- The window will display any errors or warnings. If errors are found, the download file will not be available until the errors are fixed. If warnings are found, the system will display a warning message but will allow you to download the file. (Note that all providers must have the CEP Main Provider ID assigned to them in ByteBloc Staff->User->External id or they will not be loaded into the CEP website).
- The name of the file that will be generated and used to upload into the CEP website.
- Use this link to save the file to your local computer
- Use this link to open the CEP website
- Download the file and open the CEP website as described in the previous step.
- After logging in the CEP website, the Schedule Selection screen will be displayed. (If there is any difficulty with this, go directly to www.cep.com, click on the 'Practitioners enter here' option, login, then select the 'Monthly Site Schedule' option under the 'Hospital Work Schedules & Meetings', and then click the 'Show Schedules' button.)

- Click the Config option under the Setting section
- Enable Import EPSKED option
- Clear Schedule
- At the top of the Schedule Selection, select the correct month in this area:

For example, clicking the first '3' selects March 2005.
- After making sure that the correct month and year are selected, click the 'Import from EPSKED' button:

Which will display a screen with this option box:
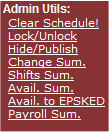
(If the 'Import from EPSKED' button is not shown because you have an existing schedule that you want to replace, click the 'Clear Schedule!' option from the 'Admin Utils.' options list.)
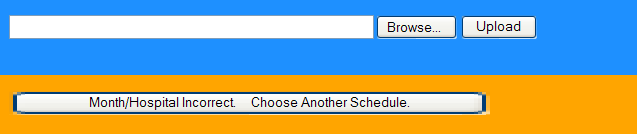
- Again confirm that you have selected the correct month and year for the schedule that you want to upload, then click on the 'Browse' button and upload the file that you saved on your computer from Step 4 above.
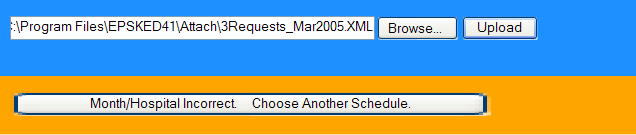
-
Click on the 'Upload' button to upload your request schedule file to the CEP website. If you have any problem with this process, please contact the CEP help desk at 510/350-2660 for assistance.
B. Download the provider shift requests from the CEP website
Once provider requests have been made on the CEP website, these requests can be imported back into ByteBloc.
- To create and download the CEP-XML schedule file from the CEP website, first login to the CEP website, then open the correct request schedule. (Go to www.cep.com, click on the 'Practitioners enter here' option, login, then select the 'Monthly Site Schedule' option under the 'Hospital Work Schedules & Meetings', then click the 'Show Schedules' button, then open the correct schedule.)
- Above the schedule, from the "Admin Utils" options as shown below, click on the 'Avail. to EPSKED' option.
- The CEP website will create a data file containing all requests made by your providers.
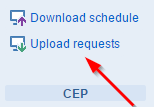
- Go back to ByteBloc, open the schedule, and click on 'Upload Requests' on the ribbon menu
- The upload requests popup window will appear:
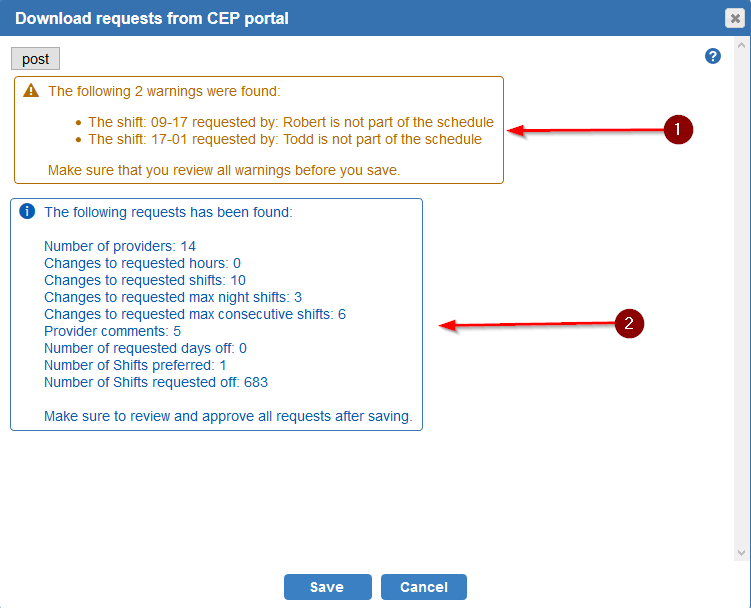
- The window will display any errors or warnings. If errors are found, the 'Save' button will not be available until the errors are fixed. If warnings are found, the system will display a warning message but will allow you to add the requests to the schedule.
- Click on the 'Save' button to save the 'Requests'.
10. Click on Preview Shifts on the ribbon menu to review the requests. Note the following:
- The CEP-XML file only includes providers who entered requests for the affected schedule, so existing requests in ByteBloc will be retained for providers who did not make requests on the CEP website.
- ByteBloc checks that shift requests apply to shifts actually used in this schedule revision.
- All 'NO' shift requests in the CEP-XML file are automatically entered.
- All 'PREF' shift requests in the CEP-XML file are scheduled to the requesting provider unless there is a conflict.
C. Publish the 'As-scheduled' schedule to the CEP website
- Open the 'As-scheduled' schedule
- Follow the same steps as publishing the 'Requests' schedule above.
D. Publish the 'As-worked' schedule to the CEP website
- Open the 'As-worked' schedule
- Follow the same steps as publishing the 'Requests' schedule above.